What is a Tech Pack? A Complete Guide for Fashion Designers
A tech pack (short for technical package) is a detailed document that includes all the data manufacturers need to make garments quickly and efficiently. It communicates every part of the design – like materials, dimensions and construction – in a simple format.
And it’s vital to get it right. Getting your tech pack wrong – or even not using one – can lead to confusion, expensive sampling and production delays.
If you’re a fashion brand working with a manufacturer, they’ll need to know exactly what you want – right down to the last stitch, seam and label. But where do you start? What needs to go into a tech pack? What format should it take?
In this in-depth guide, we’ll break down exactly what a tech pack is (and what it isn’t), what must go into one, how to create your own and how tech packs connect to things like product lifecycle management (PLM) and digital product passports (DPP).
By the end, you’ll be ready to build a factory-ready tech pack that sets your brand up for perfect production.
So what exactly is a tech pack?
Turning spectacular designs into production-ready garments takes a lot more than a sketch and a few specs. It needs a clear, consistent way to communicate all the details to a manufacturer.
That’s where a tech pack comes in.
It’s a detailed document that includes all the information a manufacturer needs to bring your product to life, from the first sample to the full production run. It outlines every single element of your design, so there’s no guesswork or back and forth between you and the factory trying to get things just so.
What’s in a tech pack?
There’s no standardised format or data list for tech packs, so they can and do vary between designers and manufacturers. But, a complete tech pack will almost always include the following things:
- Flat technical sketches of the garment including front, back and any key design details
- A bill of materials (BOM) which is a table listing all the materials used.
- Detailed measurement specs for every size, including tolerances.
- Construction details including stitching, seams, finishes and assembly details.
- Colourways and artwork including print placements, embroidery guides and Pantone codes.
- Label and packaging details such as how and where to put care labels, brand tags and hang tags.
- Sample notes where feedback and changes can be detailed during the sample approval process.
Some brands also include sustainability data like material origins or recyclability. These are especially useful if you’re planning for DPP regulations in the future.
Why is it called a tech pack?
Tech pack comes from technical pack. It’s a part of the fashion product development process where the technical side of a design – not just how it looks and feels – is vital for accurate production. Tech packs are almost the opposite of creative sketches and mood boards. They’re purely functional and remove subjectivity by showing all the technical aspects in great detail.
Who uses tech packs?
Tech packs are usually initiated by fashion designers, but they’re used throughout the production process.
- Product developers use tech packs to translate creative designs into production-ready specifications.
- Factories and suppliers use them to produce garments and source materials.
- Pattern makers use them to build technical patterns and adjust sizing.
- Quality control teams use them to check products against the original specifications.
- Production managers use them to track sample progress and control costs.
Having a solid tech pack process early on can avoid expensive errors throughout the production process.
Is a tech pack the same as a tech sketch?
Brands making the move into mass production often confuse tech packs and tech sketches, but they’re not the same thing. A tech sketch is just a component of a tech pack – it’s a visual drawing of the design. A Tech pack includes all the extra data manufacturers need to produce garments.
Why are tech packs important for fashion brands?
A tech pack is the primary way of communicating what you want to manufacturers. Getting it right can save a lot of time and money in the sampling and production process by reducing errors and miscommunications.
It also helps to build better trust and relationships with factories. In fact, many manufacturers won’t even take on a job without a well-prepared tech pack.
What goes into a good tech pack?
There’s no set formula for tech packs – but that makes it even more important to be sure you’re including the right data. The precise details will vary depending on the brand, factory and specific garment being produced – but most good tech packs will be structured something like this:
1. Cover page
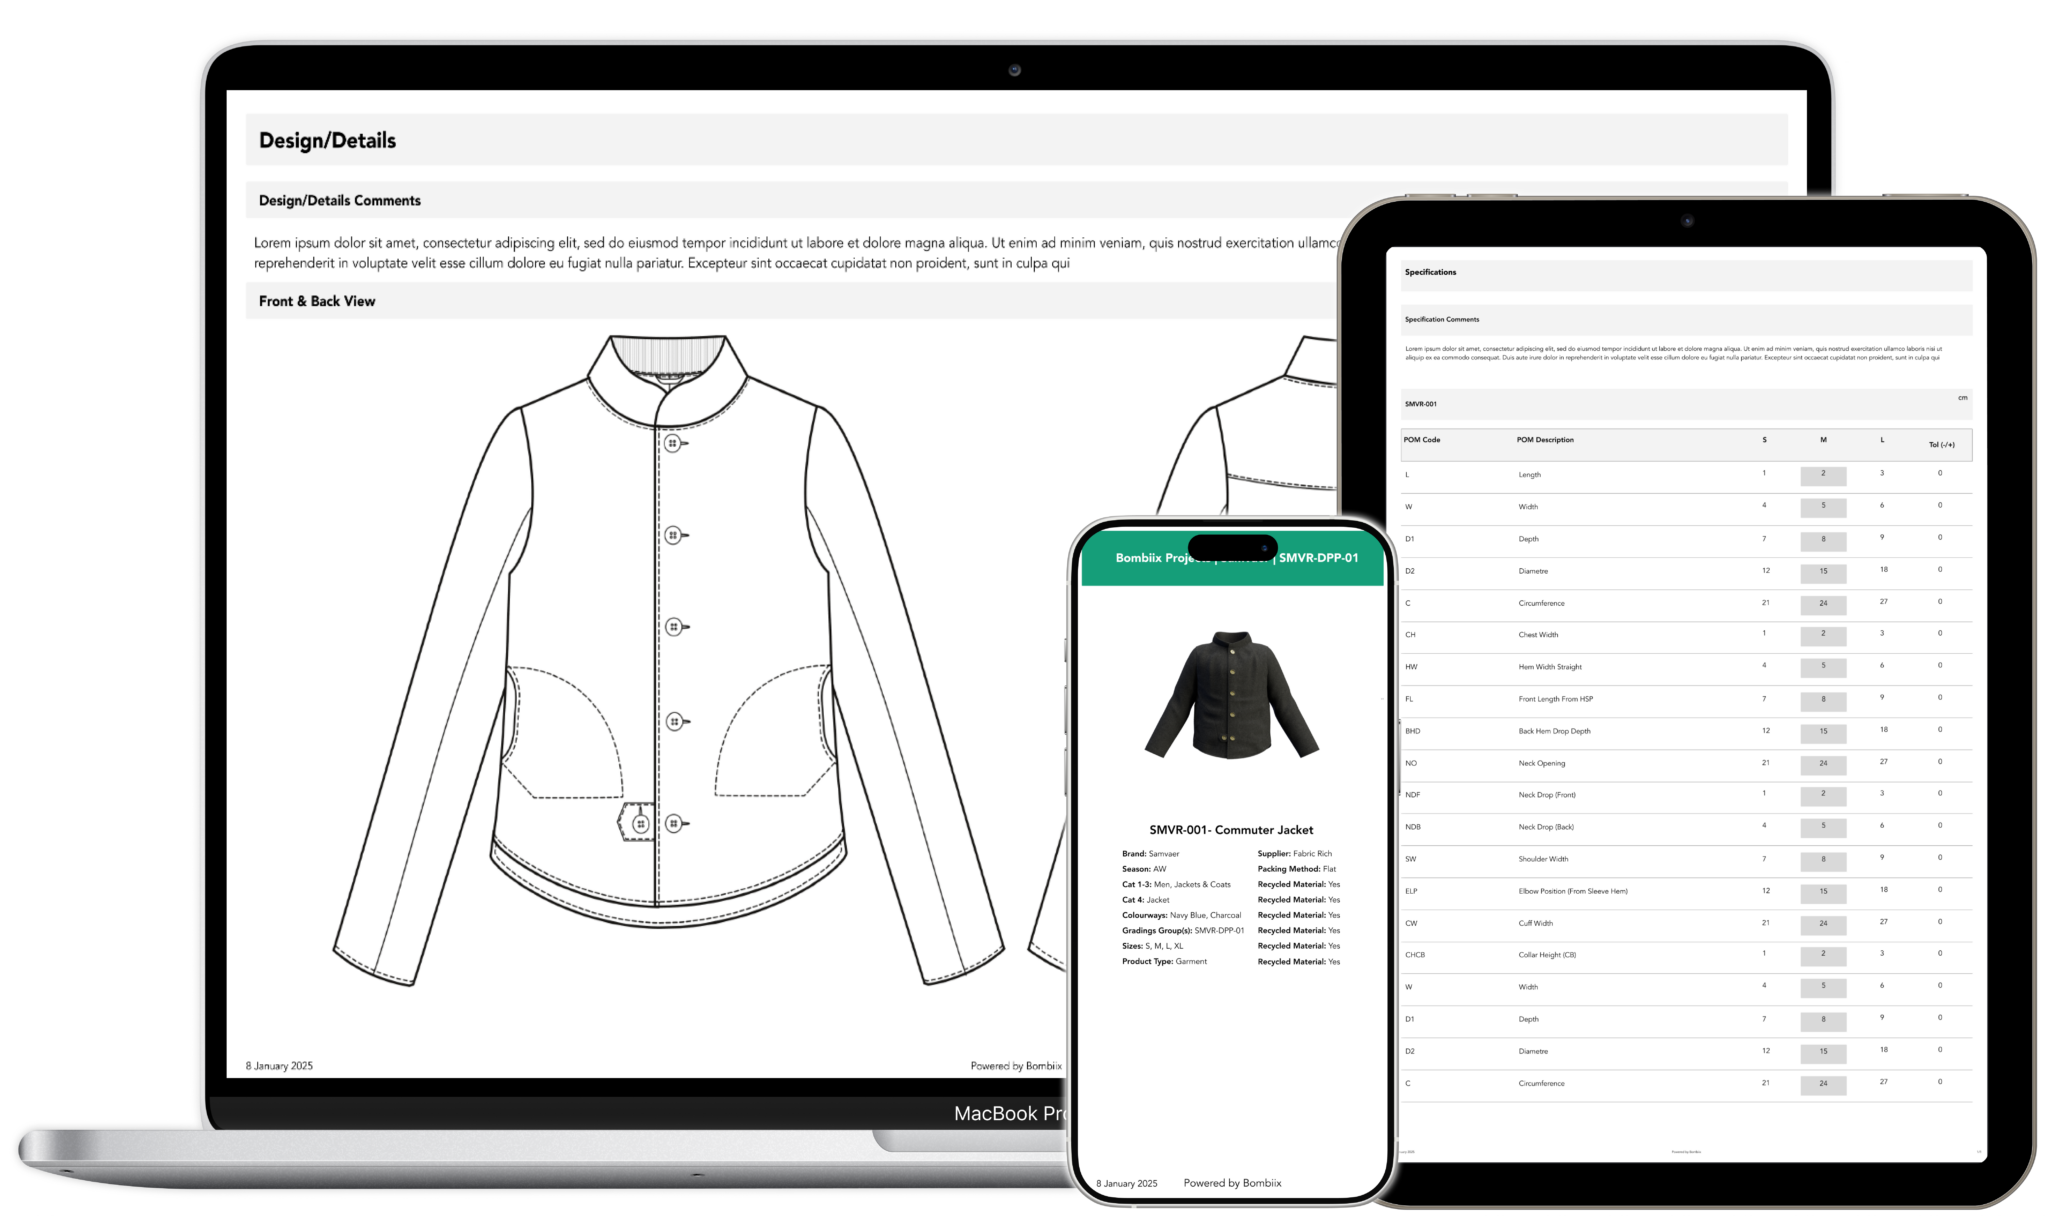
This should be an overall view of your product and include all the high-level details about your design, along with a finished flat sketch so the manufacturer can see what the garment should look like.
It should include details like the style name and number of the garment being products, some information about the brand, the designer details and the season or collection the garment is part of.
2. Technical flat sketches
These are flat, black and white sketches of the front and back of the garment. They must be vector-based, and would usually be produced in Adobe Illustrator.
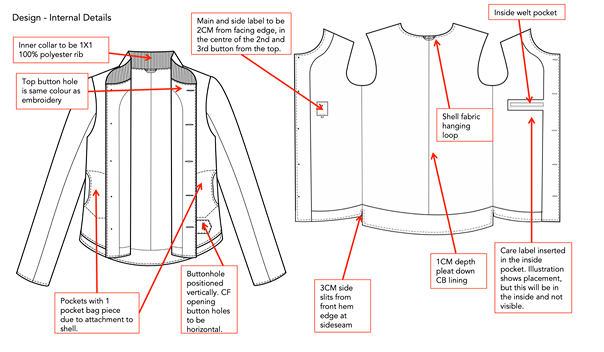
Tech sketches should include every detail of the garment, from the stitching to the trims, and include text callouts where needed.
Accuracy is key here. Tech sketches don’t need to look nice – they’re not creative designs – they’re technical documents for the factory to work from.
3. Bill of materials (BOM)
The bill of materials is a list of everything needed to assemble the product so it’s ready to ship out to stores. If possible, it should include vendor information too, to make communication between suppliers and manufacturers easier.
Every single physical item needed must be covered in detail, from fabric and labels to buttons, hangers, packaging and any artwork that’s needed.
Getting the BOM right can make sourcing materials more efficient and lead to better overall profit margins.
4. Construction details
Any specific construction techniques – like stitching types, seam finishes or any other special instructions – should be included here, to make sure the garment is put together correctly.
Photographs or diagrams can be helpful here, especially if unusual or tricky processes are involved.
5. Graded measurement specifications
Graded measurements include detailed points of measure (POMs) for your garment in every size. POMs should include tolerances for each point, so the manufacturer knows how precise they need to be.
Getting graded measurements correct means the product will be a similar fit in all sizes, so end users know what to expect.
6. Colourways and artwork
This section should include all the information the manufacturer needs to make the garment look as great as it fits.
It should include colour references (Pantone codes are the industry standard for accuracy), including colour placement, as well as details of any prints or embroidery to be used and where they should be placed. Details of any repeating patterns should also be included here.
If there are multiple variations of garments – for example, different colourways – then each one should be clearly labelled
7. Labelling and tagging
All the information needed on the care labels should be included here, including any graphics or copy. It should also include placement guides for labels and hang tags.
8. Fit comments or sample notes
This section can be used for changes and updates following rounds of sampling. This lets manufacturers easily look back on the change log and make sure they’re working with the most current version of the document.
How do you create a tech pack (without getting overwhelmed)?
Even when you know exactly what needs to go into your tech pack, creating one from scratch can still feel intimidating. With measurements, stitch types, materials and technical sketches, there’s a lot to think about. But you don’t need to be an expert to create an accurate and detailed tech pack that’s ready for the factory to start production. All you really need is a clear process and a focus on clarity in the finished tech pack.
So, let’s break down the tech pack creation process into simple, easy-to-manage steps so you can get your designs into production faster, with less back and forth with the factory.
Step 1: Start with the flat sketch
Every tech pack starts with a flat technical sketch. This is a clean, scale drawing of the garment that shows the front, the back and any key design details like pockets, zips or seams.
You don’t need to be an illustrator to get this right. It’s not a fashion illustration that needs to look beautiful. It’s a simple, clear production sketch. So you’ll need to use a tool like Adobe Illustrator, but you don’t need to be an expert. It just needs to be a black-and-white production drawing that focuses on the construction elements.
If you don’t use design software like Illustrator, you could use a freelance technical designer to help translate your concepts into a usable technical sketch.
Step 2: The bill of materials
The bill of materials is one of the most important parts of your tech pack, so it’s vital that you get it right. It tells the manufacturer exactly what they need to make your garment, so they can source the right materials. It should include the following:
- The main fabric(s), including composition and weight in gsm.
- Lining, trims, zippers, buttons, cords, labels, tags and any other bits that are needed.
- Colour details ideally as industry standard Pantone codes.
- Supplier information if you’ve sourced them.
The BOM should be laid out as a table so the data is as easy to access as possible. Use rows for each component, and columns for things like usage, material, source and colour.
If you’re planning for the future implementation of digital product passports, or for traceability and sustainability in general, this is where your data collection starts.
Step 3: Construction details
This is the section where you tell the factory all about how the garment should be made. It’s important because you want the finished article to feel as good as it looks, and the wrong kind of stitching or finishing can be the difference between something that’s just so, and something that’s just no.
So, you need to include things like the following, along with any other construction details:
- Stitch types for each location (eg flatlock, overlock, double needle)
- Seam finishing
- Special treatments like enzyme washes or distressing
- Lining methods
- Topstitching and reinforcement
When you’re putting the construction details together, try to think like a manufacturer. Ask what questions they’re likely to ask when they’re trying to build your garment, then make sure you answer them all here.
If you’re struggling to explain the construction, you can always reference a garment or sample you love and explain why it works so well.
Step 4: Graded measurements (the spec sheet)
The spec sheet is all about how your garment should fit in different sizes. So you need to go through in detail to give the manufacturer all the information they need to be able to make each size fit perfectly. It’s not enough to simply scale the design up or down for different sizes.
- Points of measurement (POMs) define things like chest width, body length, sleeve length and other vital measurements. Getting these right for every size is vital to ensure the right cut and fit.
- Base size measurements are the size that all the others are based on. Usually medium, but not always.
- Tolerances specify the acceptable range of variation during production. These need to be realistic, as some variation is unavoidable.
Make sure that this section is clear and easy to understand, and use consistent measurements. For example, you could use distances from reference points like the armhole or collar. If it’s easier, use a diagram.
Step 5: Define the colourways, artworks and labels
Garments often have several different colour options or versions. This section documents changes between versions. Even if you only have a single version, you can still show how colours and prints are to be used.
- Detail fabric and trim colours for each version. Remember to use Pantone codes wherever possible. If there are multiple colours on a single garment, specify where each colour should be.
- Show exactly where any artwork or prints should be placed. Include measurements, and make sure you include the print artwork files.
- Do the same for any embroidery details. Make sure you include artwork files here too.
- Show exactly where any labels, tags and other extras are positioned with detailed measurements.
It’s generally a good idea to include visuals or diagrams here, so the manufacturer can see what the finished garment should look like. These don’t necessarily need to be polished finished designs – an annotated screenshot or mockup can eliminate a lot of guesswork.
Step 6: Sample notes and fit comments
When you begin the sampling process, it’s useful to keep a running log of samples in the tech pack. You can break this down by sample version (v1, v2 etc) and include feedback for each version, along with the changes and adjustments requested. This creates a historical record that both you and the factory can reference to help you stay consistent over time.
Step 7: Organise and export
Once all the sections are complete, it’s important to review the tech pack to make sure everything is accurate, clear and consistent. Then it’s time to export it in your chosen format. Most factories will accept either a PDF, an Excel spreadsheet or a shared Google Sheet, but it’s worth checking first before committing to a format.
Make sure you use a clear filename that makes it easy to differentiate from your other products, and from other brands too. Remember that the factory will be working with other brands as well as yours. You could use something like ‘YourBrand_CollectionName_ProductName_v1-1.pdf. Make sure you follow good file naming conventions to ensure it’s easy to find and open.
Then, if you’re using a PLM platform like Bombiix, you can upload and version it there.
Remember, a tech pack isn’t static. It will change and evolve through development. So make sure you have a system in place to keep track of changes.
Keep it simple but complete
Remember, a tech pack doesn’t need to look beautiful. It just needs to get the important information the manufacturer needs across as efficiently as possible. It also doesn’t need to be perfect on the first try. Sometimes it’s better to get something over to the factory and start the sampling process so you can see and feel the garment, and adjust from there.
If you’ve invested in a PLM solution like Bombiix then you’ll often get tech pack generation as part of the package. With Bombiix, you can even access the tech pack generator completely for free. But it’s still good to understand the process, so you can be confident that your tech pack is as accurate and detailed as possible.
How do tech packs support digital passports (DPPs)?
Digital passports are set to change the way fashion brands do business. They’ll soon be mandatory for any businesses that trade in the EU, and the rest of the world won’t be far behind. DPPs require detailed information and tracking about how garments are made.
They’re like a digital record that follows a product through its entire lifecycle, and they include details like materials used, where those materials came from, where the garment was made, repair instructions and recyclability.
So, what does that have to do with tech packs? Well, many of the details needed for a DPP start in the tech pack.
- The materials, including their origins, should be included in the BOM.
- Construction quality and design durability should be in the construction details.
- Labelling and compliance information should be included.
- Supply chain data can be included in the tech pack and can also be linked through your PLM system.
As sustainability and traceability become more important, a good tech pack becomes more than just a tool for manufacturing. It becomes the foundation for responsible product data, and helps you stay compliant with digital product passports
Every fashion brand needs to master the tech pack
Tech packs are a vital tool for any brand that wants to grow beyond in-house production. They provide manufacturers with the data they need to make garments accurately and efficiently, with minimal back-and-forth with samples.
And it’s important to get on board with tech packs early on, too. Some factories won’t even work without a tech pack, and trying to work without one can be expensive and lead to delays in getting the product to market.
As your brand grows, and things like DPPs become more important, tech packs become more vital too. Investing in an integrated PLM and product development suite like Bombiix early can make you significant savings in the long run, and help you scale your business more efficiently.